Tuesday, August 16, 2011

Are Re-Inspections Necessary?


When a home buyer asks a seller to make repairs to a property after a home inspection, how do the repairs get verified?  Do they get verified?  Do they need to be verified?  I recently blogged about a hack chimney repair that I found at a re-inspection, and several people commented about the importance of re-inspections.
I sent out an email to several real estate agents that I respect and have had recent communication with, to ask about their take on the importance of re-inspections.  Not surprisingly, their answers were all very similar.  I’ve compiled the most common statements below.
Try to avoid asking the seller to make repairs.  If the seller is going to make repairs, they’re probably going to do the least amount of work possible, use the least amount of money possible, and the repairs will often be sub-par or just plain unacceptable.  It’s often better to ask the sellers to fund repairs, or ask for the price of the home to be adjusted accordingly.  The downside to adjusting the price of the home, however, is that the buyers will need to come up with cash to make repairs.
When requesting repairs, make sure everyone understands the issue(s).  An excellent home inspection report will usually be enough to make everything clear and understandable.  If there is any confusion, ask the home inspector for clarification.
A common problem with a repair request is to ask for the wrong thing to be fixed, or to specify an improper repair.  For instance, if a furnace has a cracked heat exchanger, it would be just plain silly to ask for the crack to be repaired.  The furnace needs to be replaced.
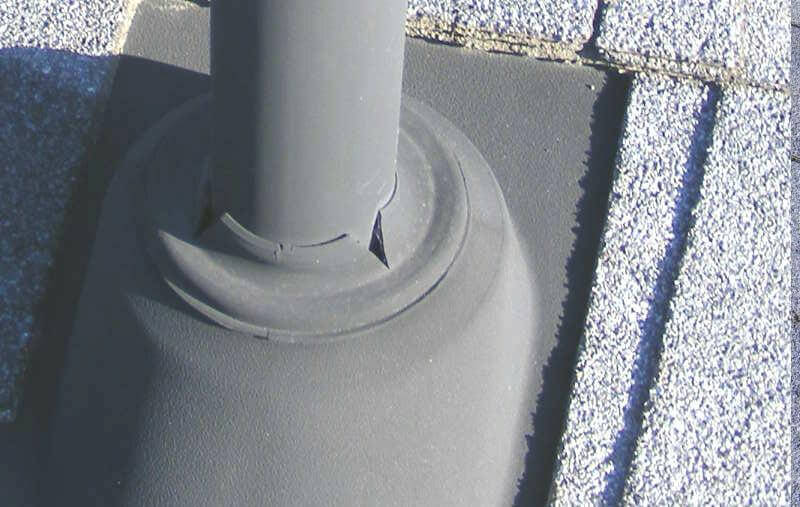
Split boot at plumbing vent
Cracked rubber boot at plumbing vent flashing
One of the more hilarious misunderstandings happened when the buyer asked the seller to address the plumbing vent flashings, which had rubber boots that had dried out and split.  The seller told the buyer that they fixed the dried out boots by applying a lubricant.  No joke.  I can’t make this stuff up.
When requesting repairs, request building permits.  Not only does this force the seller to ‘follow the rules’, but it should make the buyer feel better knowing that the work was inspected by an authority, and it puts the cost of the re-inspection on to the seller’s lap.
When requesting repairs, be specific.  If the purchase agreement addendum is poorly written or isn’t specific, the repairs won’t be completed properly… if at all.  A vague, poorly written addendum might say
Have the leaking laundry sink repaired. 
Leaking Laundry Sink
What are the odds that someone will complete this repair with a tube of caulk? A well written addendum may specify the problem, how the repairs should be completed, who should complete the work, and how the repairs will be verified.
The concrete sink in the laundry room is cracked and leaks profusely when filled with water, creating unsanitary conditions.  Have the leaking laundry sink replaced by a Minneapolis licensed plumber, and an appropriate plumbing permit obtained and approved by the Minneapolis plumbing inspector.  The seller shall have the corrections completed, inspected, and approved no later than one week prior to the date of closing.  Documentation of the repairs, including any applicable receipts, permits, and lien waivers shall be provided to the buyer no later than one week prior to closing.
In this second example there was very little left to interpretation.  In some cases, however, the exact method of repair doesn’t need to be specified.  For instance, if there are several defects inside an electric panel, it’s probably good enough to specify the defects, request repairs, and request an electric permit.  Leave it up to the electrician to decide how to best repair the defects.
When all of the above happens, a re-inspection by the original inspector probably isn’t necessary, but it may still be worthwhile.  Just as we find countless defects by licensed contractors on new construction inspections, improper repairs frequently happen with real estate transactions, no matter who does the work.  When there is any doubt in the buyer’s mind as to the quality of the work being done, it may be worthwhile to have a re-inspection performed.
My two cents:  I don’t do many re-inspections, mostly because of all the items stated above.  When I do get hired to re-inspect a property, I base my price on how much time I think the re-inspection is going to take.  If the seller is a property flipper who was given a list of twenty things to repair, I know from experience that maybe half of the repairs will be completed properly, and the other half either won’t be done or will be done incorrectly.  I charge the most for these types of transactions, because they become a contentious pain in the butt.
On the other hand, if I’m going out to look at three specific repairs and the buyer or the buyer’s agent has provided me with receipts from licensed contractors, I won’t charge nearly as much because the repairs will probably be fine.  Those are a breeze.
The bottom line: Re-inspections never hurt.  If repairs are being done by licensed contractors, the repair requests are specific,  and appropriate permits are pulled, re-inspections probably aren’t necessary.  If the repairs are being done by the seller, I strongly recommend a re-inspection.  I have yet to do a single re-inspection where it was the seller who completed the repairs, and everything was done properly.
Special thanks to the following real estate agents for taking their time to share their advice with me: David K. Wells IIIDebbie Nelson-SchefflerHoney BuckJim StarrLinda HeglandMichael Harrell, and Sharlene Hensrud.
Reuben Saltzman, Structure Tech Home Inspections - EmailHome Inspector Minneapolis
Facebook Reuben's LinkedIn Page Follow StructureTech on Twitter ASHI Certified Home Inspector - Click To Verify Click to subscibe to Reuben's Blog

Tuesday, August 9, 2011

What do these stains on the windows mean?


Water stains on window sills is often a source of anxiety for home buyers, and it’s the home inspector’s job to help determine if the stains are the sign of a major problem or not. There are three common causes of water stains on windows:
  • Leaving the windows open.  The windows get left open, and water pours in through the window during a rain storm.  This type of staining will often leave fairly uniform water staining across the window sill.
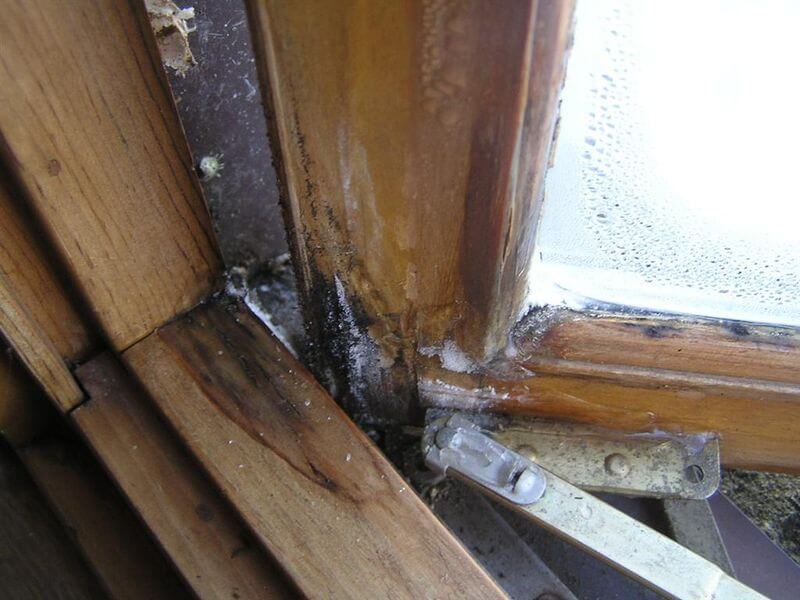
  • Condensation Staining at windowCondensation.  If it’s a wood window, you’ll see stains at the corners of the window sashes and the window sills if the stains are caused by condensation.  You’ll also find the worst stains on the windows that are most likely to be damp, such as in bathrooms or bedrooms just outside the bathrooms.  The windows at the north side of the house will be worse than windows on the south side.
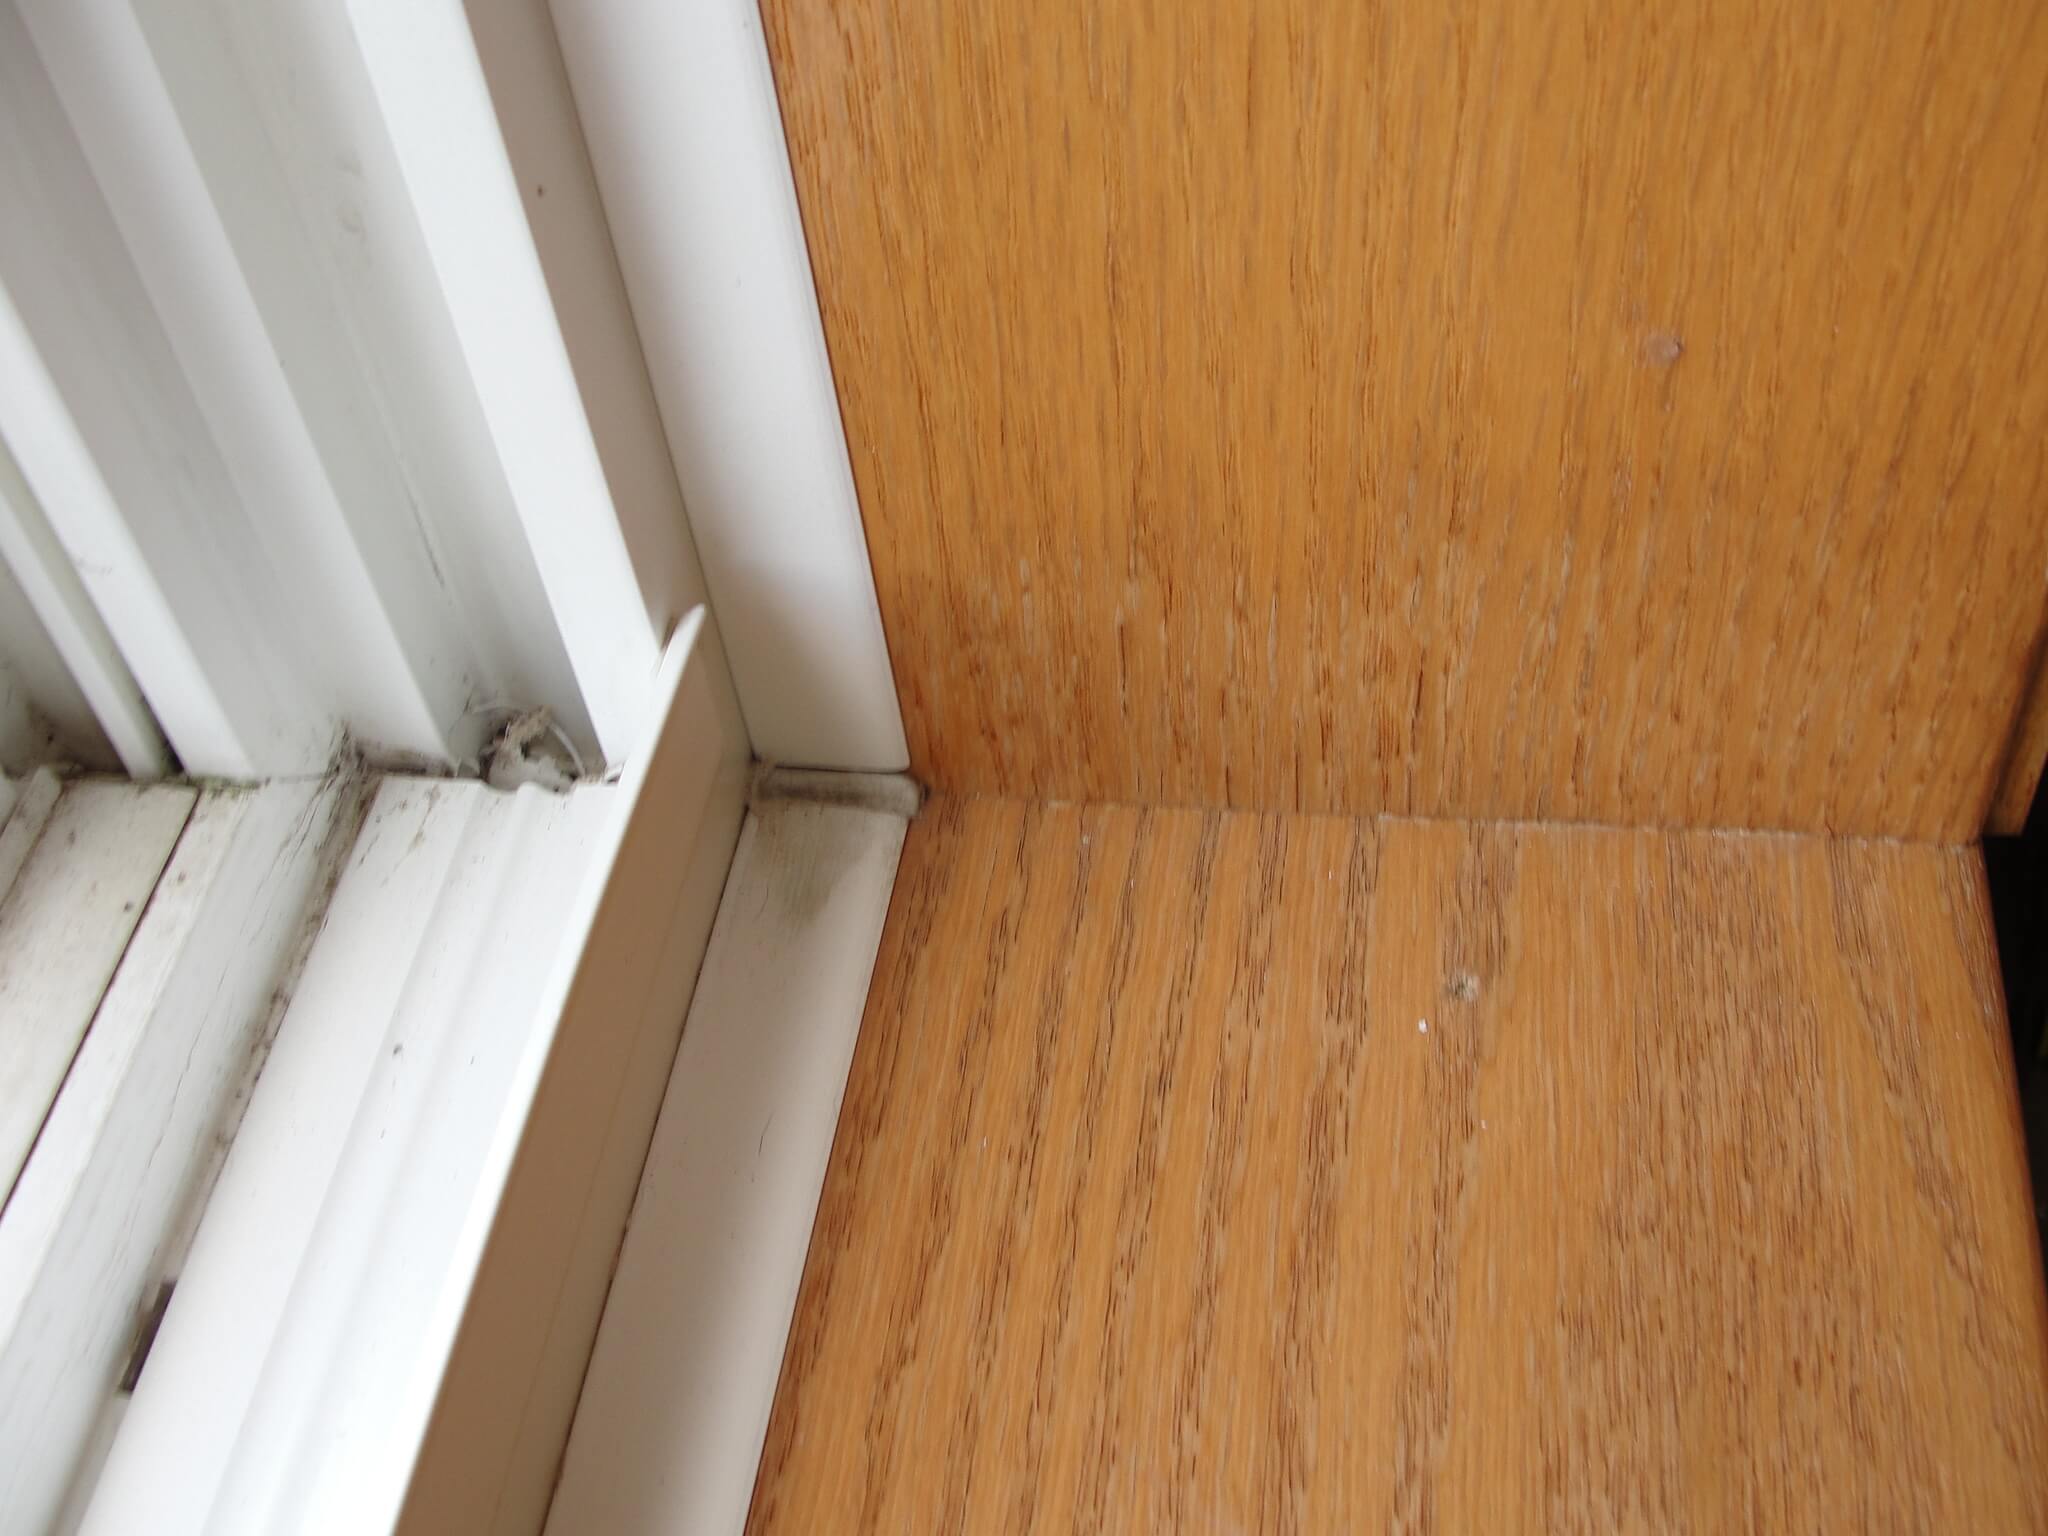
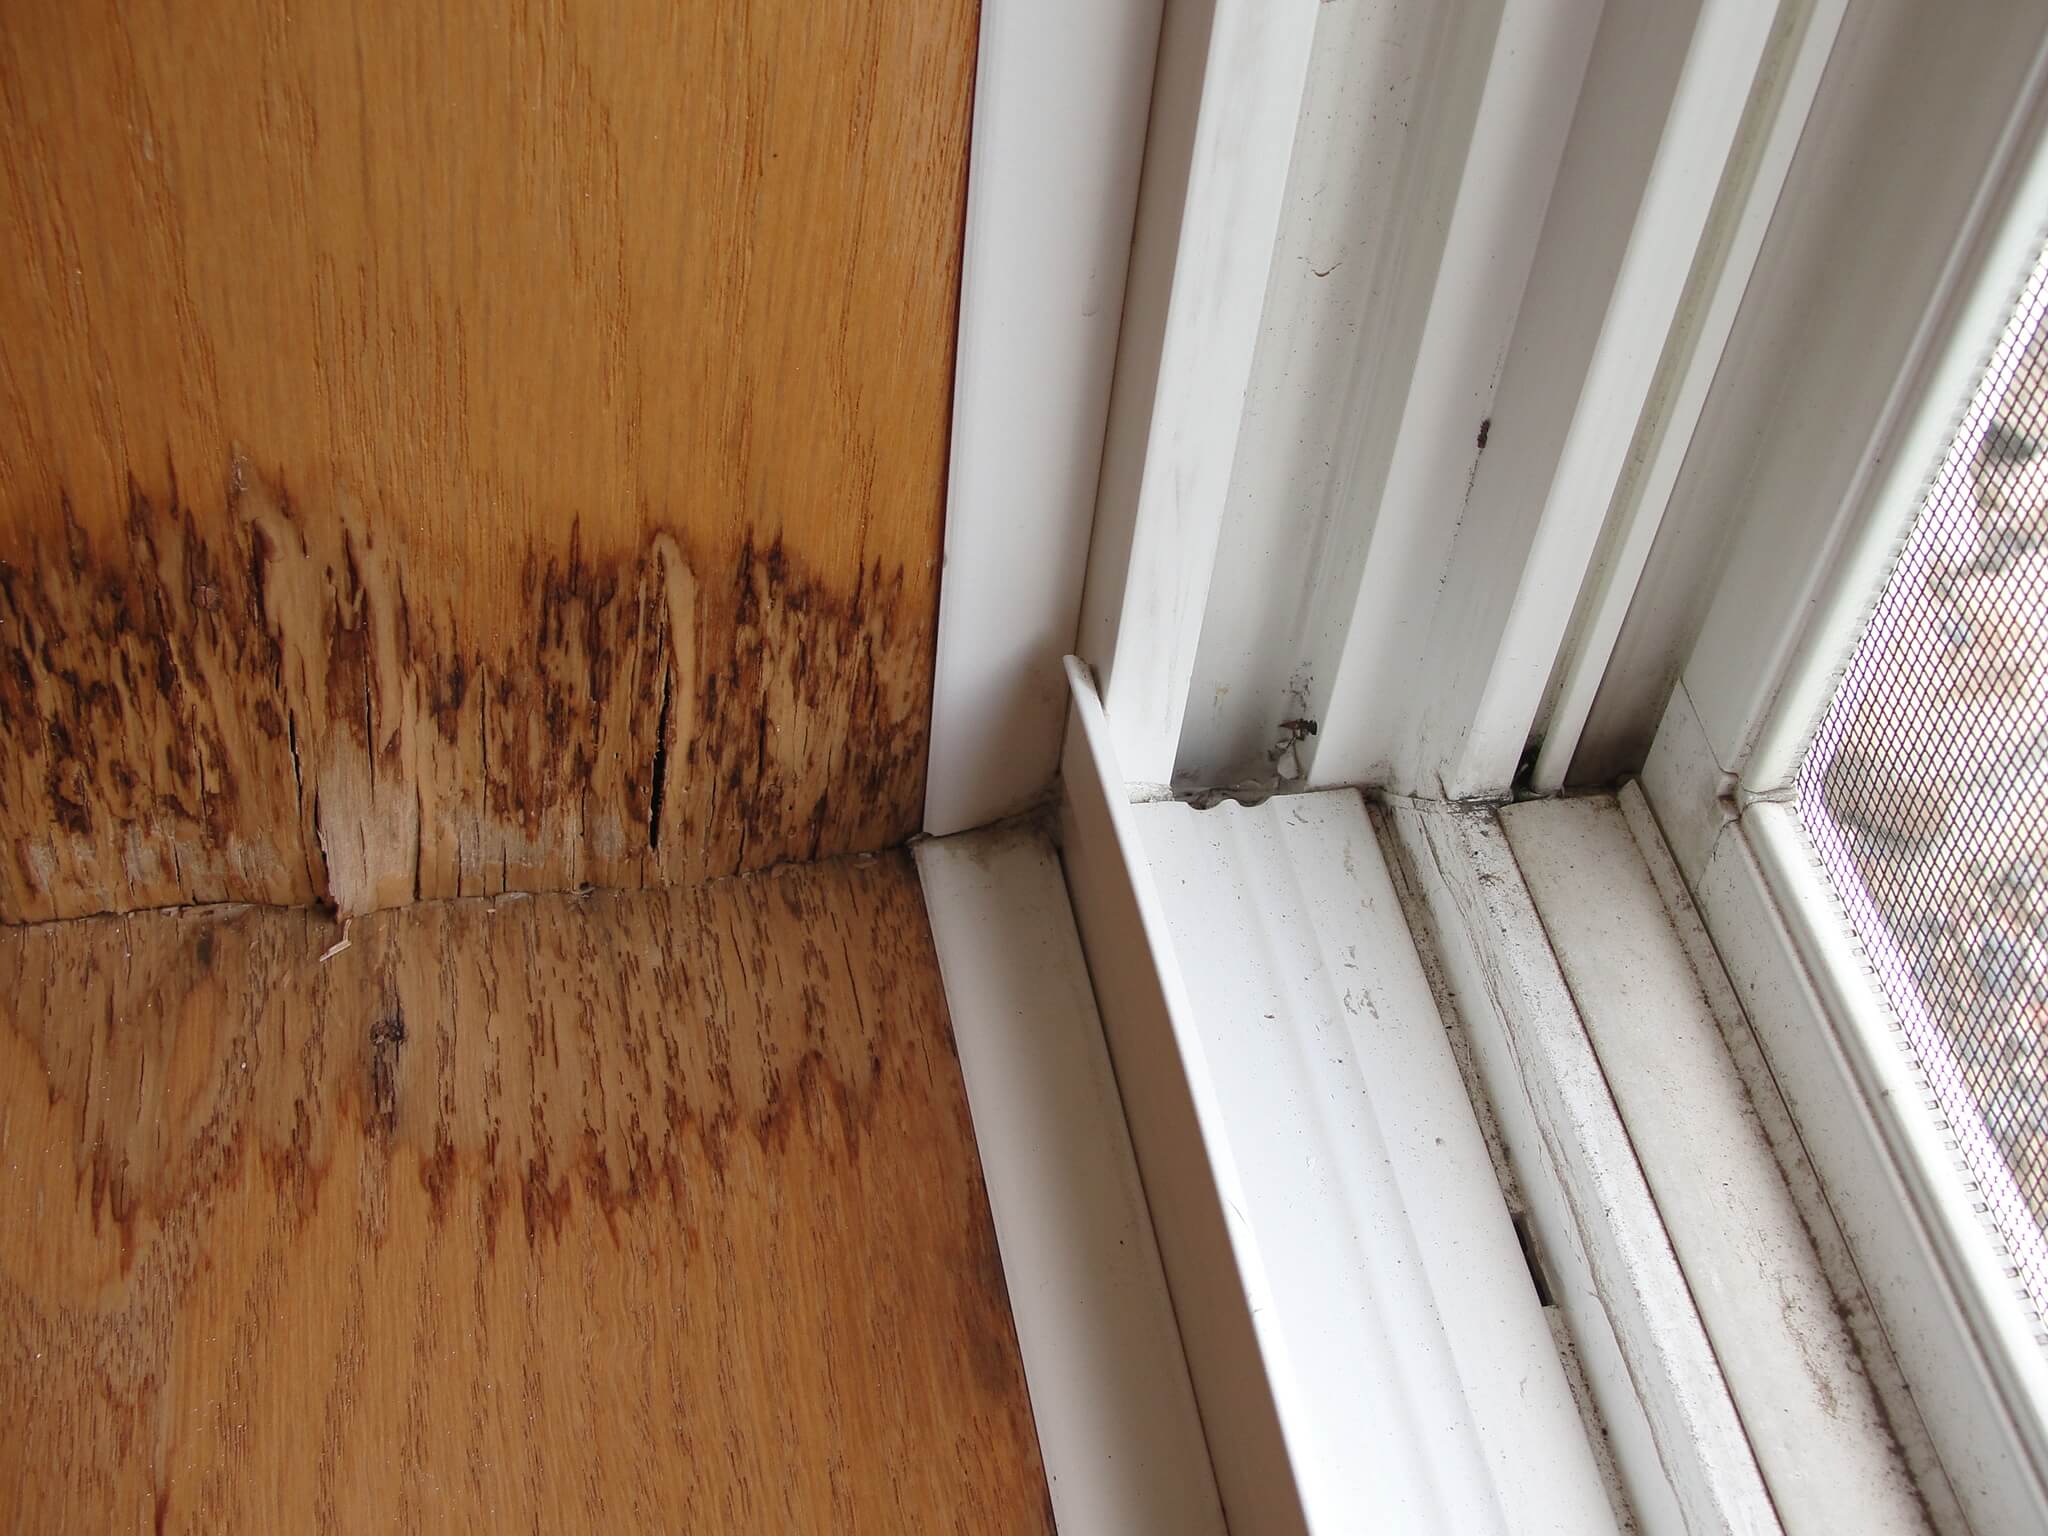
  • Leaking windows. If water is actually leaking in to the house around the opening for the window at the siding, this will typically show up as staining at the corners of the window sills.  The photo below left shows what a windows sill may look like with minor water leakage in to the wall; the photo below right shows a window sill with major damage from water leakage.  A home inspector could use a moisture meter to help determine if the stains are currently damp.
Water staining at window sill from minor leakage Water staining at window sill from major water leakage
The first two causes of stains are fairly straightforward and easy to prevent; remember to close the windows before it rains, and lower the humidity in your home.  Here are a few tips to lower the humidity in your home:
  • Turn off your whole house humidifier (duh)
  • If you have one, use your kitchen exhaust fan when you’re cooking.  Gas ovens add a considerable amount of moisture to the air.
  • Turn on your bathroom exhaust fan during showers and leave them on for a half hour after every shower.  If you don’t have a bathroom exhaust fan, get one.  While the building code allows an openable window as a substitute for a fan, I don’t ;-)
  • If you have a crawl space, make sure that a proper vapor barrier is installed on the crawl space floor.
  • Install an HRV or a continuous exhaust fan.  Either one of these will dramatically lower humidity levels in a home.
The third cause of staining at windows, leaking water from the exterior, is the one that home buyers should be concerned about.  A window can leak from just the slightest defect in flashing at the top, and unfortunately, it’s not easy for home inspectors to know if a window is going to leak just by looking at the siding.
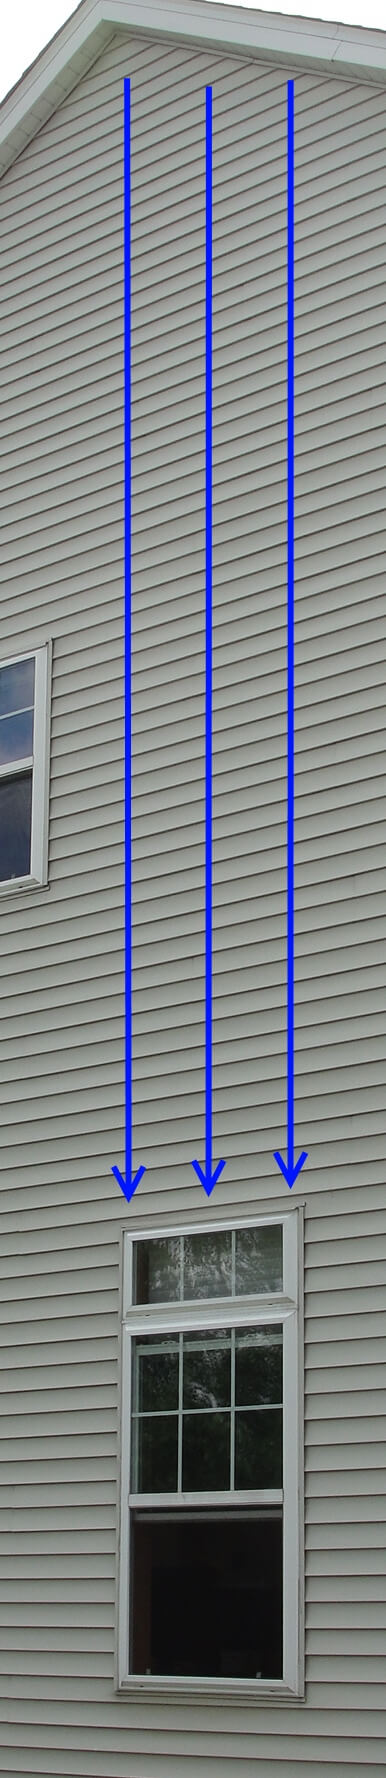
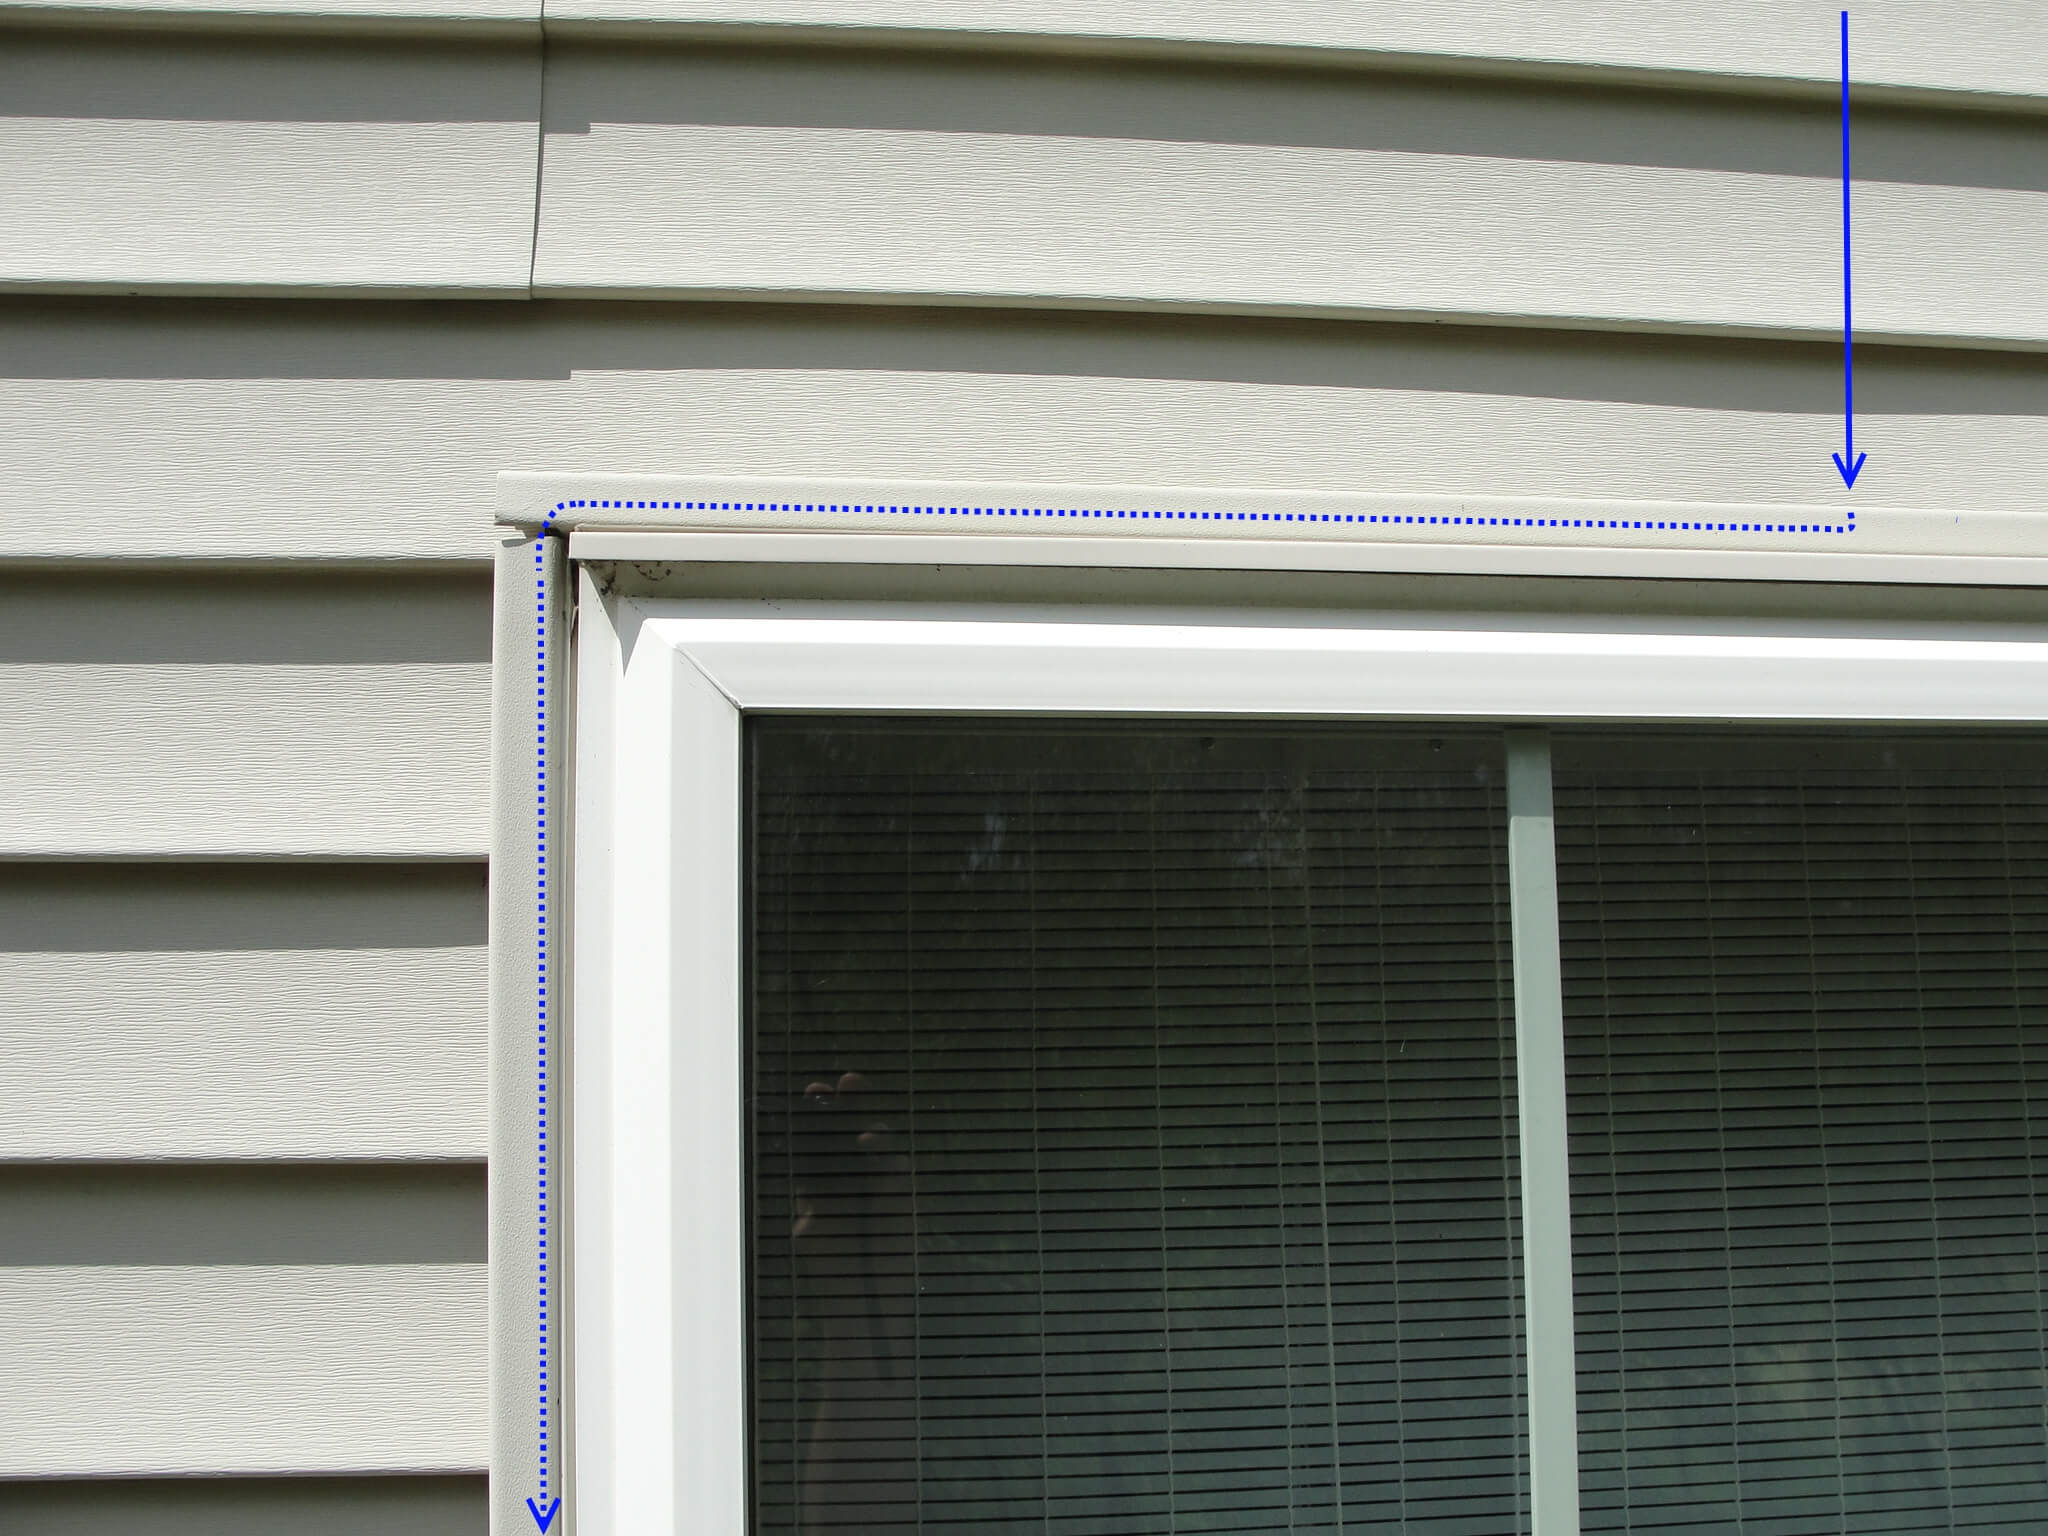
View of window from outsideIf the flashing above a window is installed properly, all of the water coming down the siding will be diverted around the sides of the window.  The windows that will be exposed to the most water are the windows that aren’t protected from rainwater by soffits and gutters – such as the window shown at left.
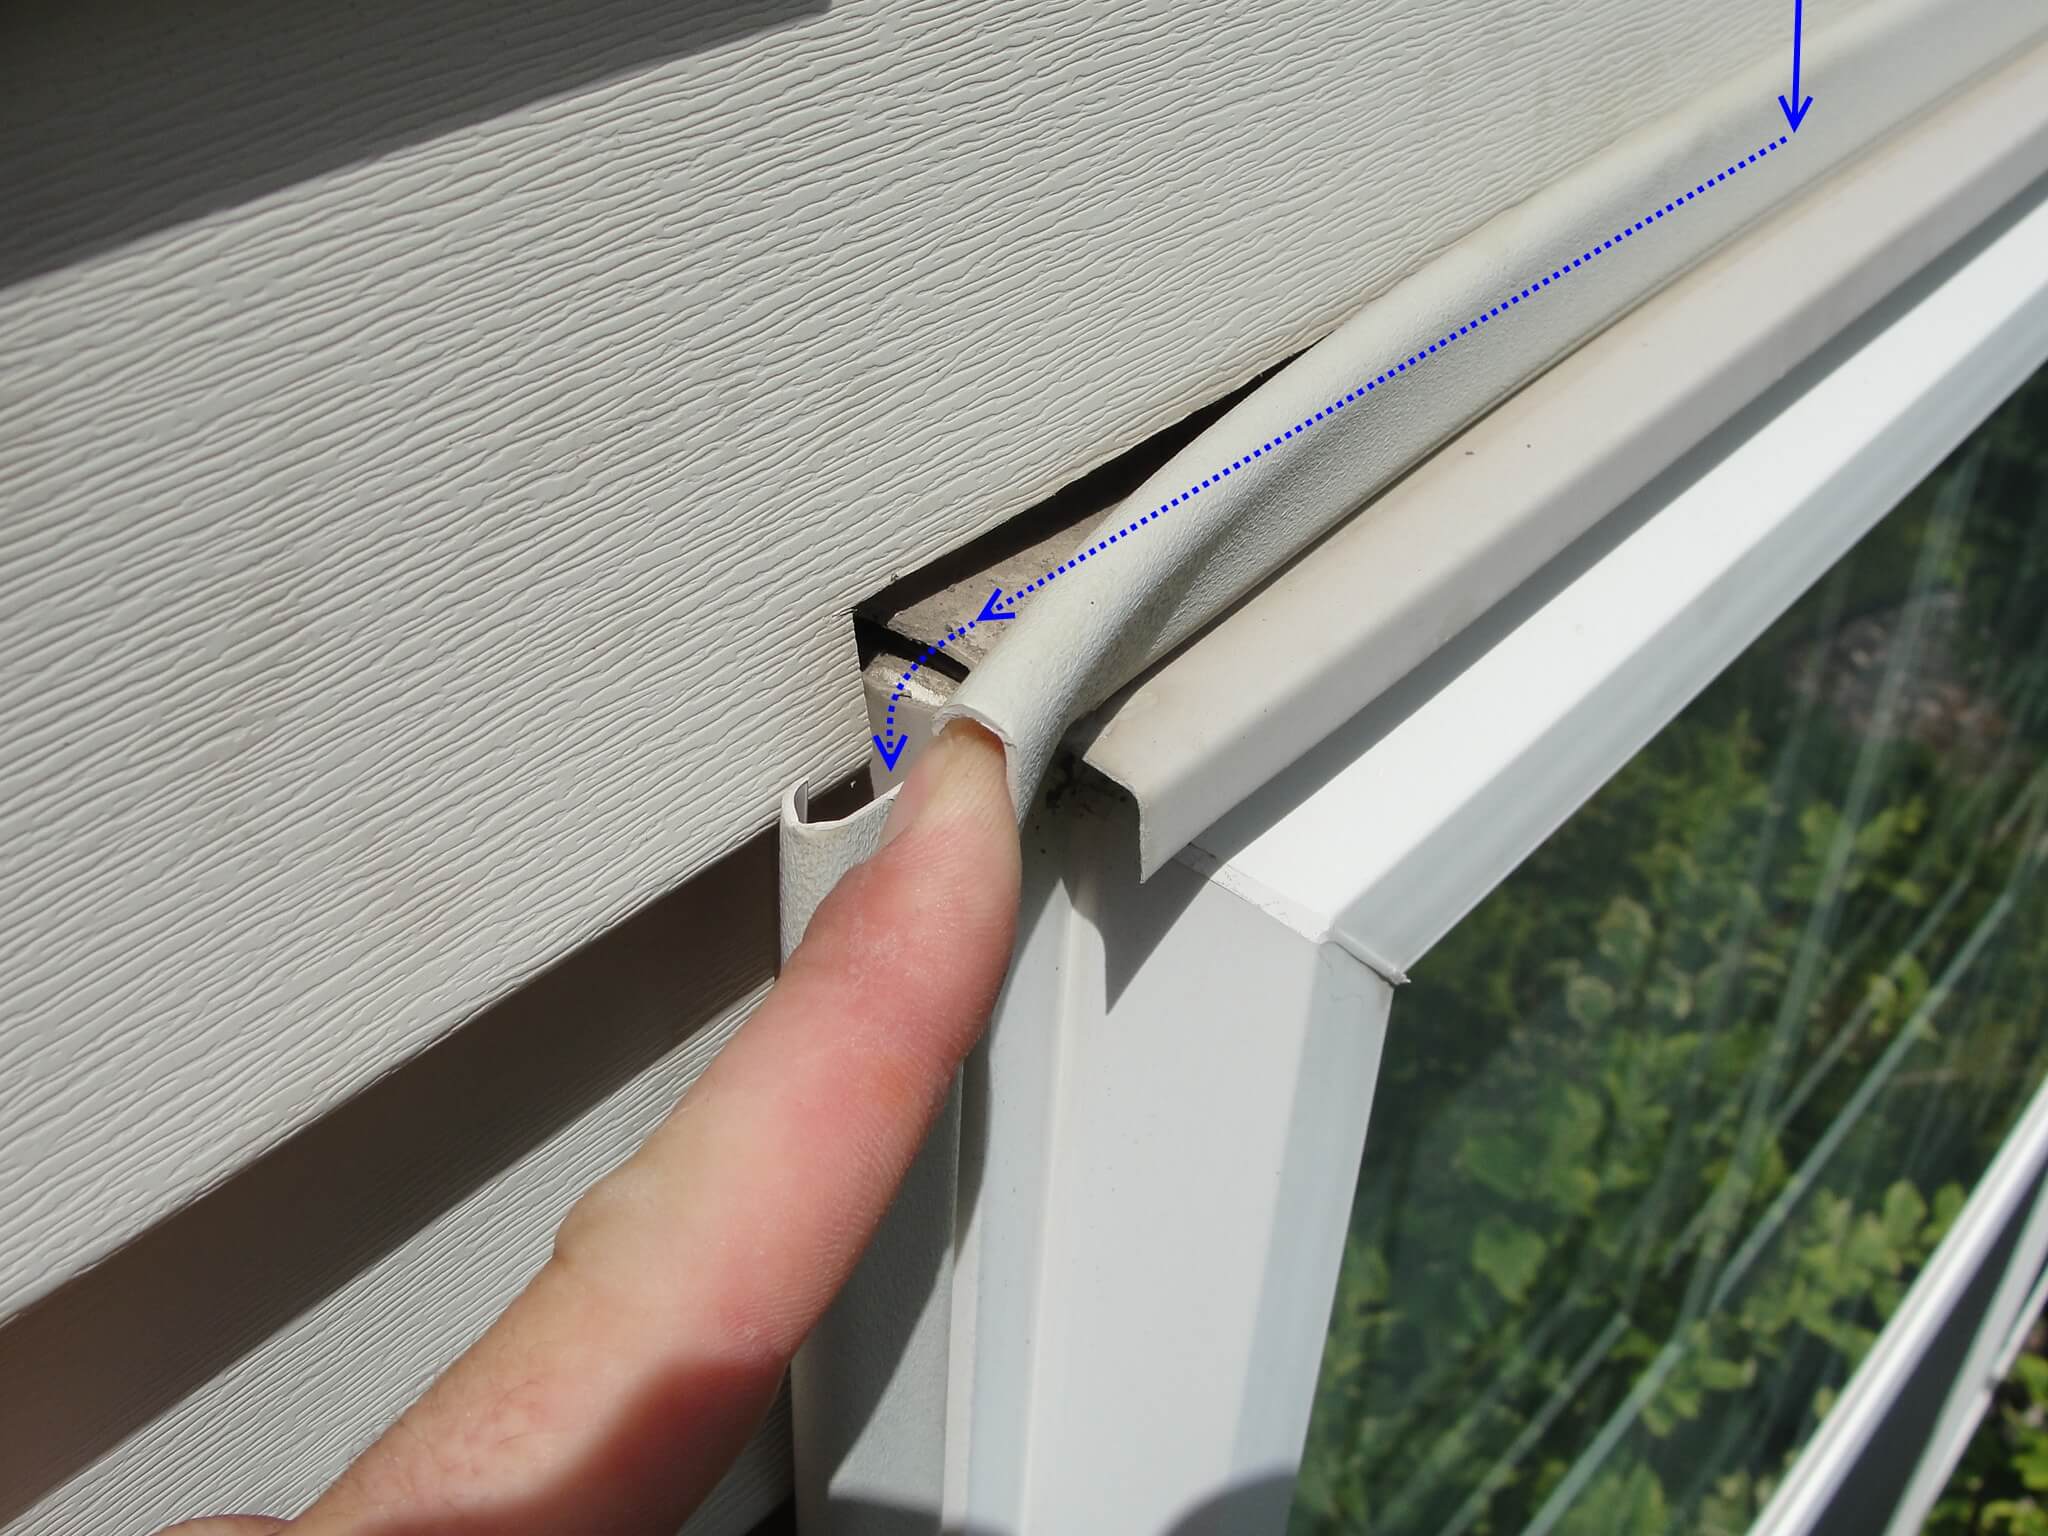
The photo below shows the proper path for the water to take; I know this is kind of a ‘no-duh’ issue, but actually thinking through this stuff helps me to know which windows I really need to pay particular attention to during home inspections.
Proper Water Path
Here’s a close-up view of the window flashing, showing the path that water is supposed to take… but this window has a nasty detail in the flashing that will be prone to leakage.  Do you see it?
Proper Water Path closeup
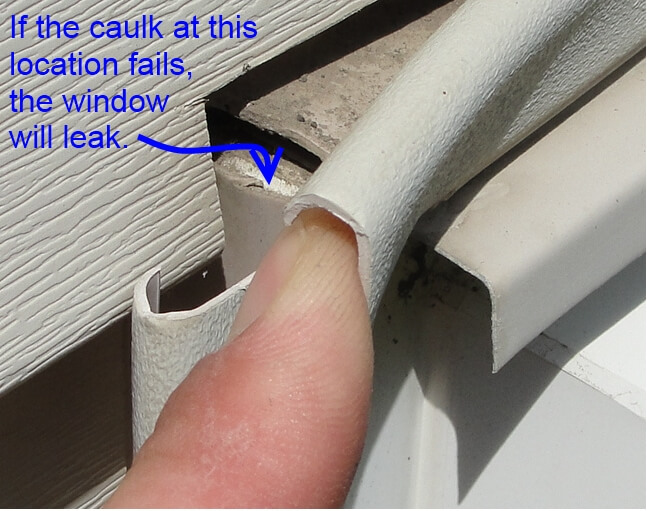
Here’s another close-up view, pointing out the exact issue with the flashing.
Proper Water Path closeup 2
As you can see in the photo above, if the caulking at the J-molding around the window fails, the window is going to leak.  Big time.  As a matter of fact, it has failed at this particular window, and that’s what is causing the major water staining at the bottom of the sill, which is what was shown above.   Could you tell just by looking at the exterior of the window?  I couldn’t.
The repair for this condition is to have the flashing redone, so the window isn’t relying on the caulking to keep water out.  This project will probably only take about an hour or two to complete, but it would have taken the original installer an extra two minutes to get it right.  My first thought was that the installer was either lazy or a bonehead, but at the time this window was installed, which was about twelve years ago, this was just the way it was done.
If I saw an installation like this on a relatively new home, I’d call it a boneheaded installation.
Reuben Saltzman, Structure Tech Home Inspections - EmailHome Inspector Minneapolis
Facebook Reuben's LinkedIn Page Follow StructureTech on Twitter ASHI Certified Home Inspector - Click To Verify Click to subscibe to Reuben's Blog


Tuesday, August 2, 2011

Chimney Repairs: Watch Out For Hacks With Trowels

I don’t get hired to re-inspect chimney repairs often, but when I do, I’m often disgusted.  Here’s how it works: the home inspector says the chimney needs repair, and the buyer tells the seller to fix the chimney.  The sellers usually hire the cheapest chimney repair contractor they can find… and it’s usually an unqualified hack with a trowel.
Just as there is a big difference in the quality of work between home inspectors, there is a similar gap in the quality of work between good chimney contractors and hacks.  I’d like to share a couple of our recent encounters with these chimney hacks.
The $214 Chimney Re-Build
I inspected a home in Saint Louis Park that had a chimney with bricks that were disintegrating, and in need of major repair.
Disintegrating chimney bricks
Here’s what I wrote in my inspection report:
The bricks at the chimney were literally falling apart. They were disintegrating and allowing water in to the chimney,which will hasten their deterioration. I suspect the bricks used at the chimney weren’t the right type. Have the upper portion of the chimney re-built. This will be a major expense.
The buyer went back to the seller asking for the chimney to be repaired, and the seller hired someone to fix it… for $214.  That’s a fraction of what I was guessing it would cost, so when the buyer learned what the seller paid for the repairs, he was rightfully suspicious and hired me to go back out.  The photo below shows what I found:
Hack chimney repair
I know what you’re thinking – either “that’s the same picture!” or “where’s the duct tape?”, right?  If you click on either of the photos for a larger view, you’ll notice that in the second photo, someone simply slapped some mortar on the chimney; they didn’t fix it.  This chimney still needs repair.

The Disintegrating Chimney Crown

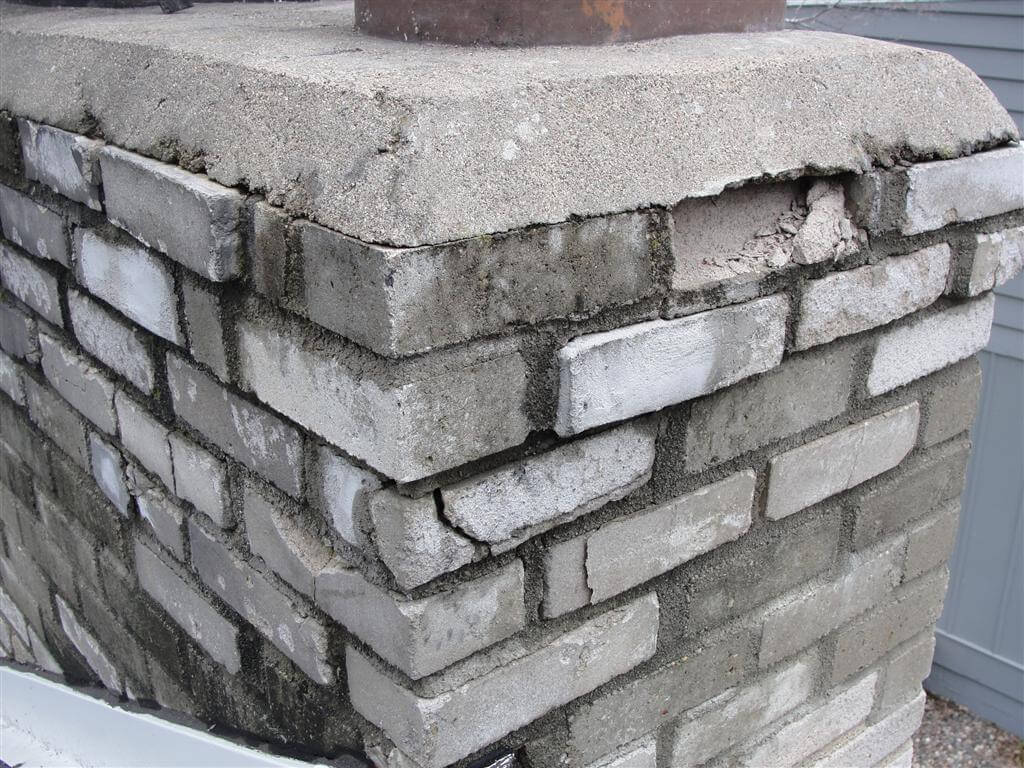
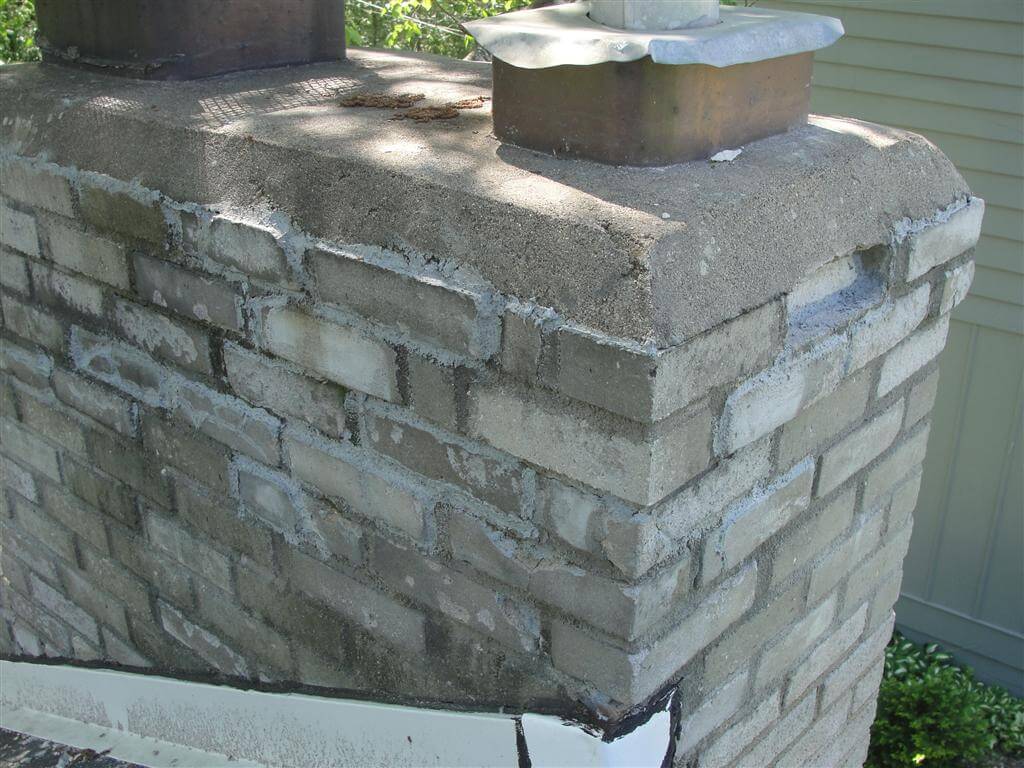
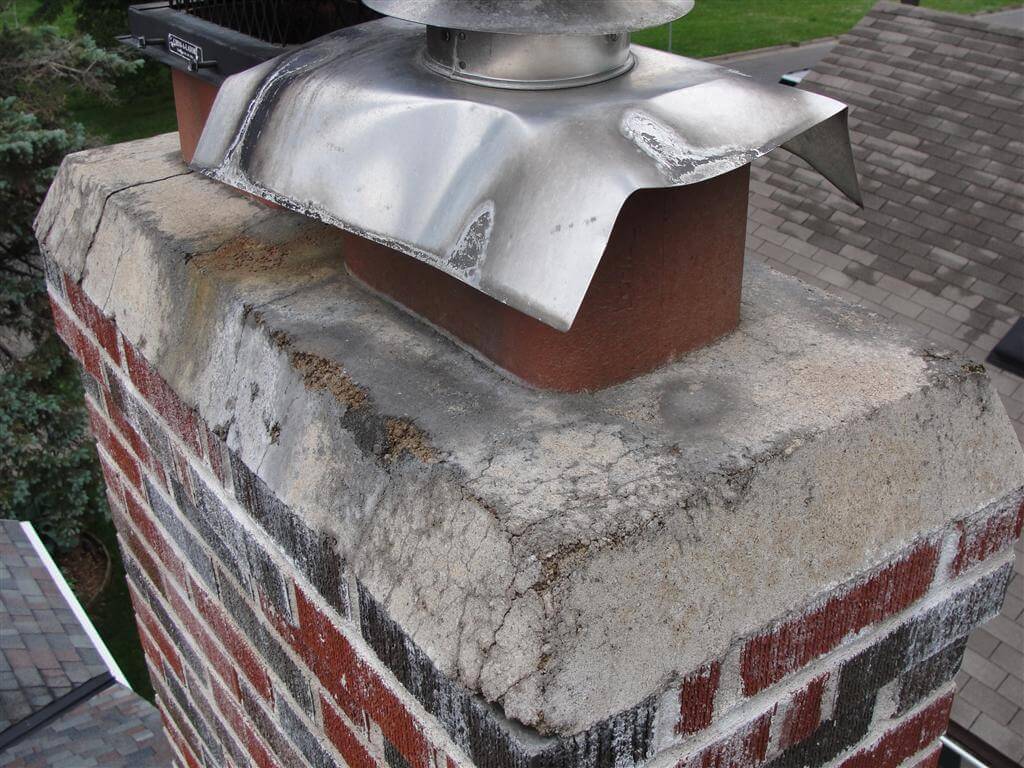
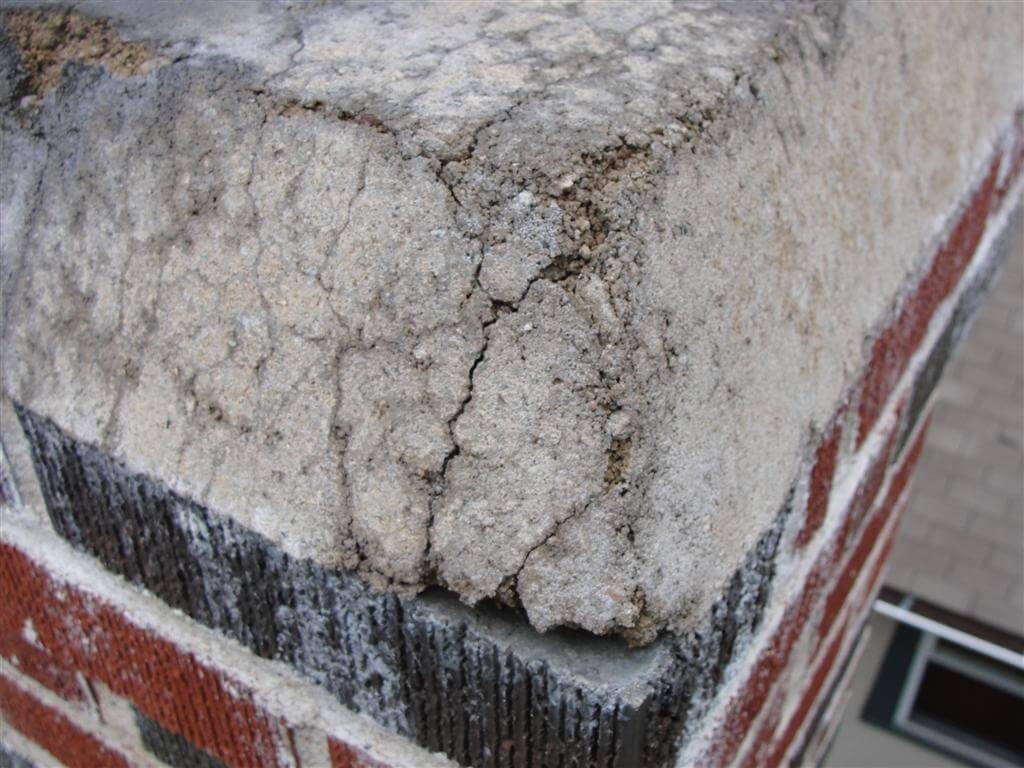
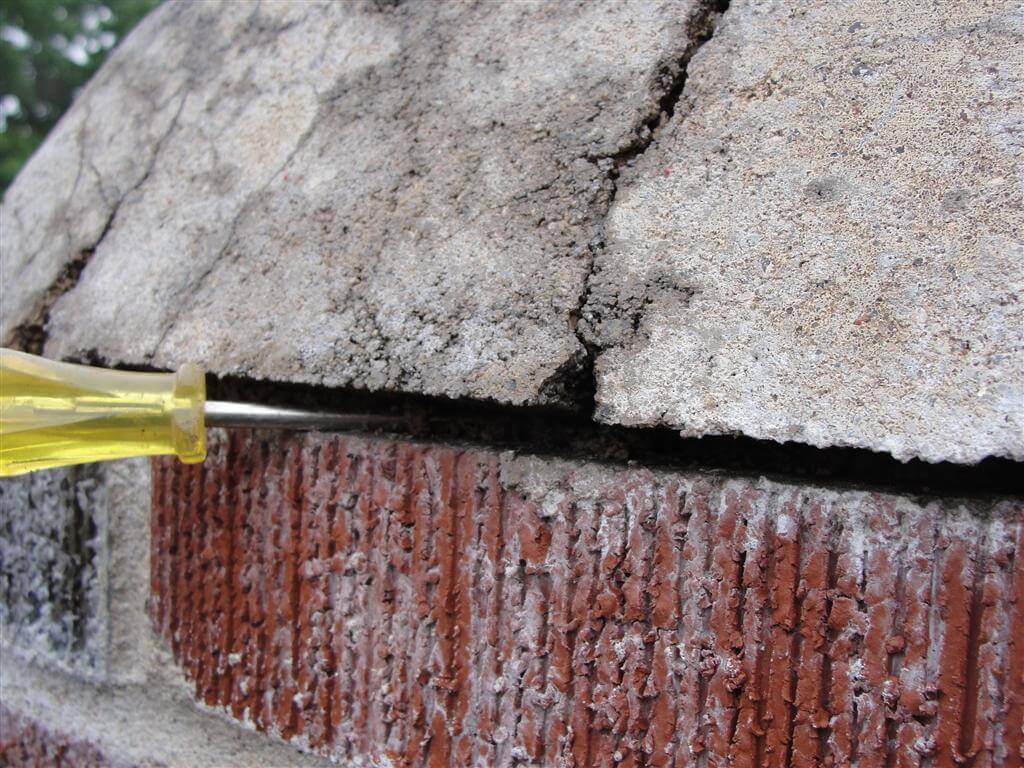
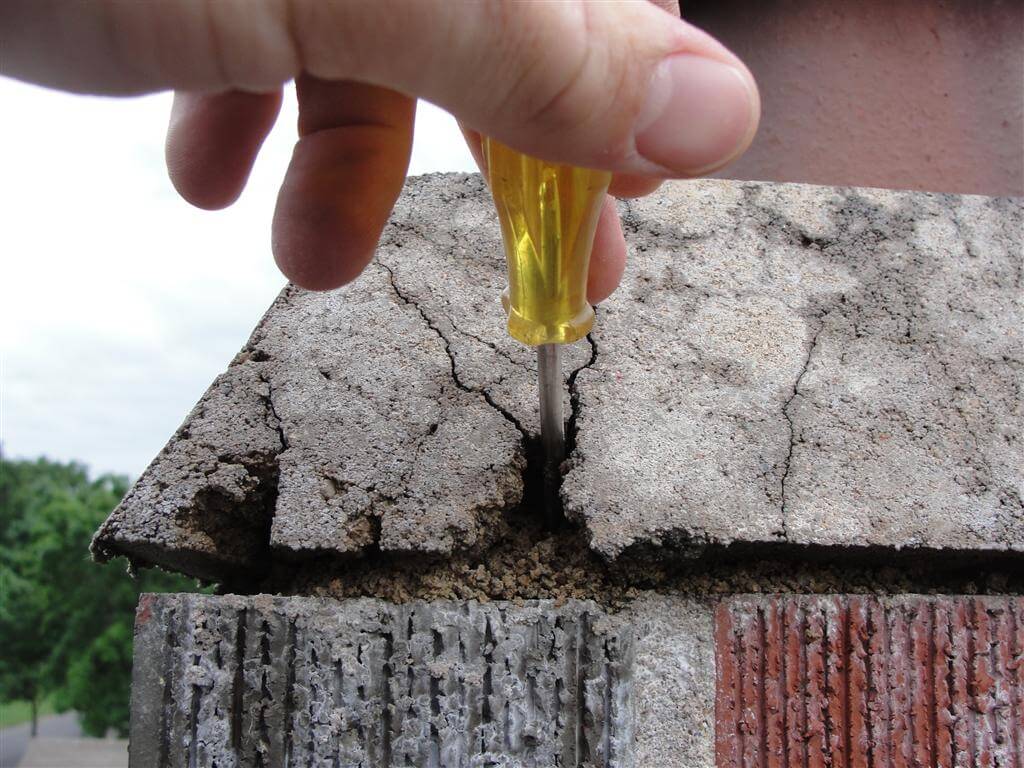
I inspected a home in Minneapolis with a chimney that had recently been rebuilt.  The chimney walls looked great… but the crown was literally falling apart, due to a poor mix of concrete.
Disintegrating chimney crown 1Disintegrating chimney crown 2Disintegrating chimney crown 3Disintegrating chimney crown 4
Unfortunately, the entire crown will need to be redone.  Hopefully someone will go with a better mix of concrete, and a better design of crown as well.  To read about the differences in chimney crown designs, click here Tops to Last a Lifetime.

The Dry Stack

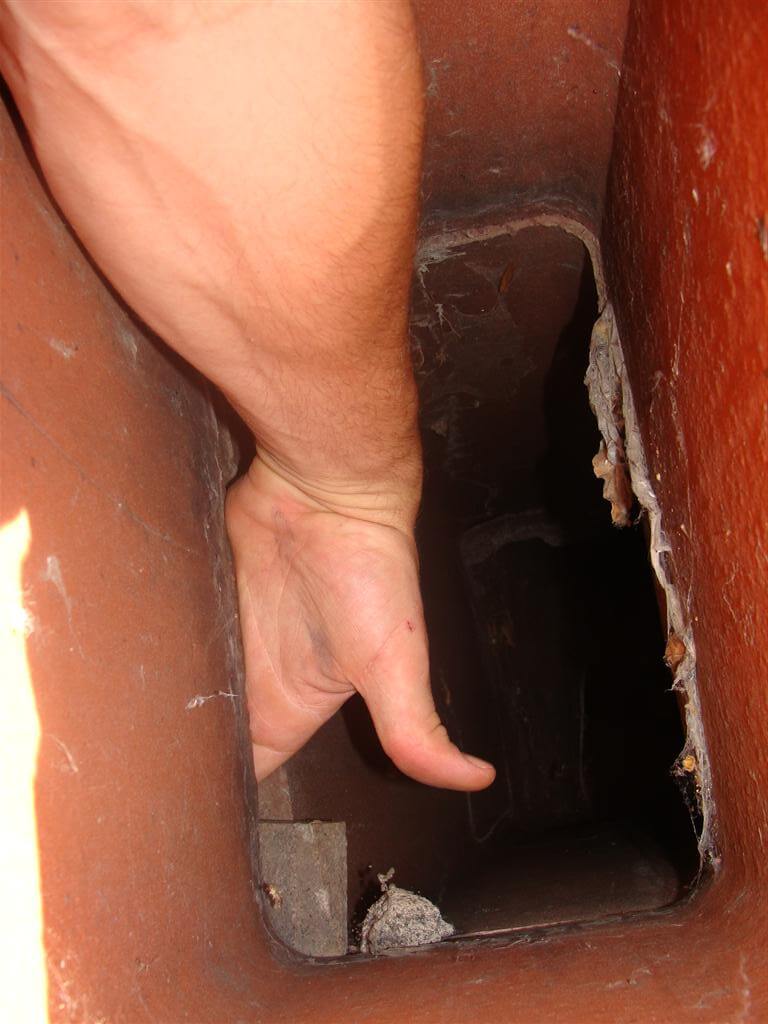
Neil inspected a home in Minneapolis where the clay tiles had been stacked together without any mortar between the joints.
Gap in fireplace flue
In order to be safe for use, the chimney liner must contain all products of combustion, which means every joint needs to be tightly mortared.  Neil told the buyer that this was an improperly constructed chimney that should be repaired.
The buyer hired a CSIA Certified Chimney Sweep to give an estimate on the repair; it was approximately $8,000.  The seller had someone else come out, who happened to be a mason and volunteer firefighter, who said the missing mortar wasn’t a concern.  Pardon me?  A volunteer firefighter does not a forensic fire investigator make.  I’ll trust the chimney expert, as well as the building code, which says “Clay flue liners shall be laid in medium-duty refractory mortar conforming to ASTM C 199 with tight mortar joints left smooth on the inside…”
Hopefully I’ve made my point. There are a lot of hacks with trowels that claim to be chimney experts.  There are three local companies that I’ve had firsthand experience with and recommend regularly: Jack Pixley Chimney Sweeps and MasonryLondon Chimney Sweeps, and 2nd Generation Chimneys.  The one thing that they all have in common is that they’re all CSIA Certified Chimney Sweeps.  If you’re looking for a high quality chimney contractor in your area, you would do well to start at www.CSIA.org.  They have a zip code search right on their home page.
Reuben Saltzman, Structure Tech Home Inspections - EmailHome Inspector Minneapolis
Facebook Reuben's LinkedIn Page Follow StructureTech on Twitter ASHI Certified Home Inspector - Click To Verify Click to subscibe to Reuben's Blog